How to Get More Responses From Your Cold Emails
Before reading this action-packed, example-laden article, check out our 3-minute video on cold emails from our Leveling Up YouTube channel:

TABLE OF CONTENTS:
- Is Cold Email Still Relevant?
- What Does the Research Say about Email Marketing?
- Getting Inside the Mind of Your Target Audience
- 1) Understand the Psychology of the Prospect
- Sell to the Emotional Human, not the Logical Corporation
- Send Your E-mail at the Right Time
- Understand Your Prospects’ Workflow
- 2) Grab Their Attention with the Perfect Subject Line
- 1) Quick Question
- 2) X Tips for [Company] for [Pain Point]
- 3) “Congrats on [Specific Result]!”
- 4) Praise-Related Subject Lines
- 5) Use a Familiar Sender Name
- 6) Create Urgency
- 7) Subject Line Length
- 8) Pay Attention to Your First Sentence
- 9) Test Your Subject Lines
- 3) Write Top-Notch E-mail Copy
- 1) Brevity Is the Soul of Wit
- 2) Ditch the Elevator Pitch
- 3) Be Human
- 4) Use Automation to Increase Your Sales Volume
- A) Welcome E-mails
- B) Curation E-mails
- C) Discount E-mails
- E) Abandoned Cart E-mails
- 5) Be Persistent in Your Follow-Up E-mails
- A) Follow Up Right After You Leave a Voicemail
- B) Reference Behavioral Insights
- C) Make Follow-up E-mails Different from the First Cold E-mail
- 6) Have Fewer Prospects in Your Campaign
- 7) Use the Problem-Agitate-Solve (PAS) Model
- Putting It All Together
Is Cold Email Still Relevant?
Cold email is dead…or at least it is for people who don’t know the intricacies of this channel.
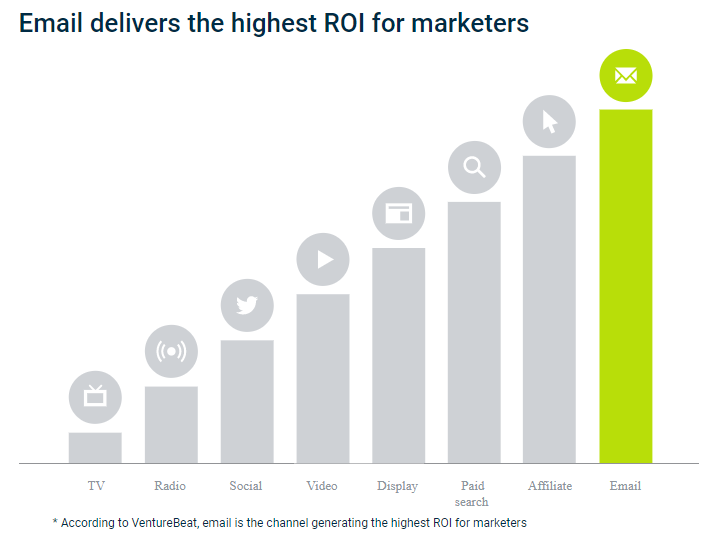
But people who do are still generating incredible results through cold emails. They’re the people who know that email delivers the highest ROI for marketers – even higher than social, paid search and affiliate marketing:
They know that with email marketing:
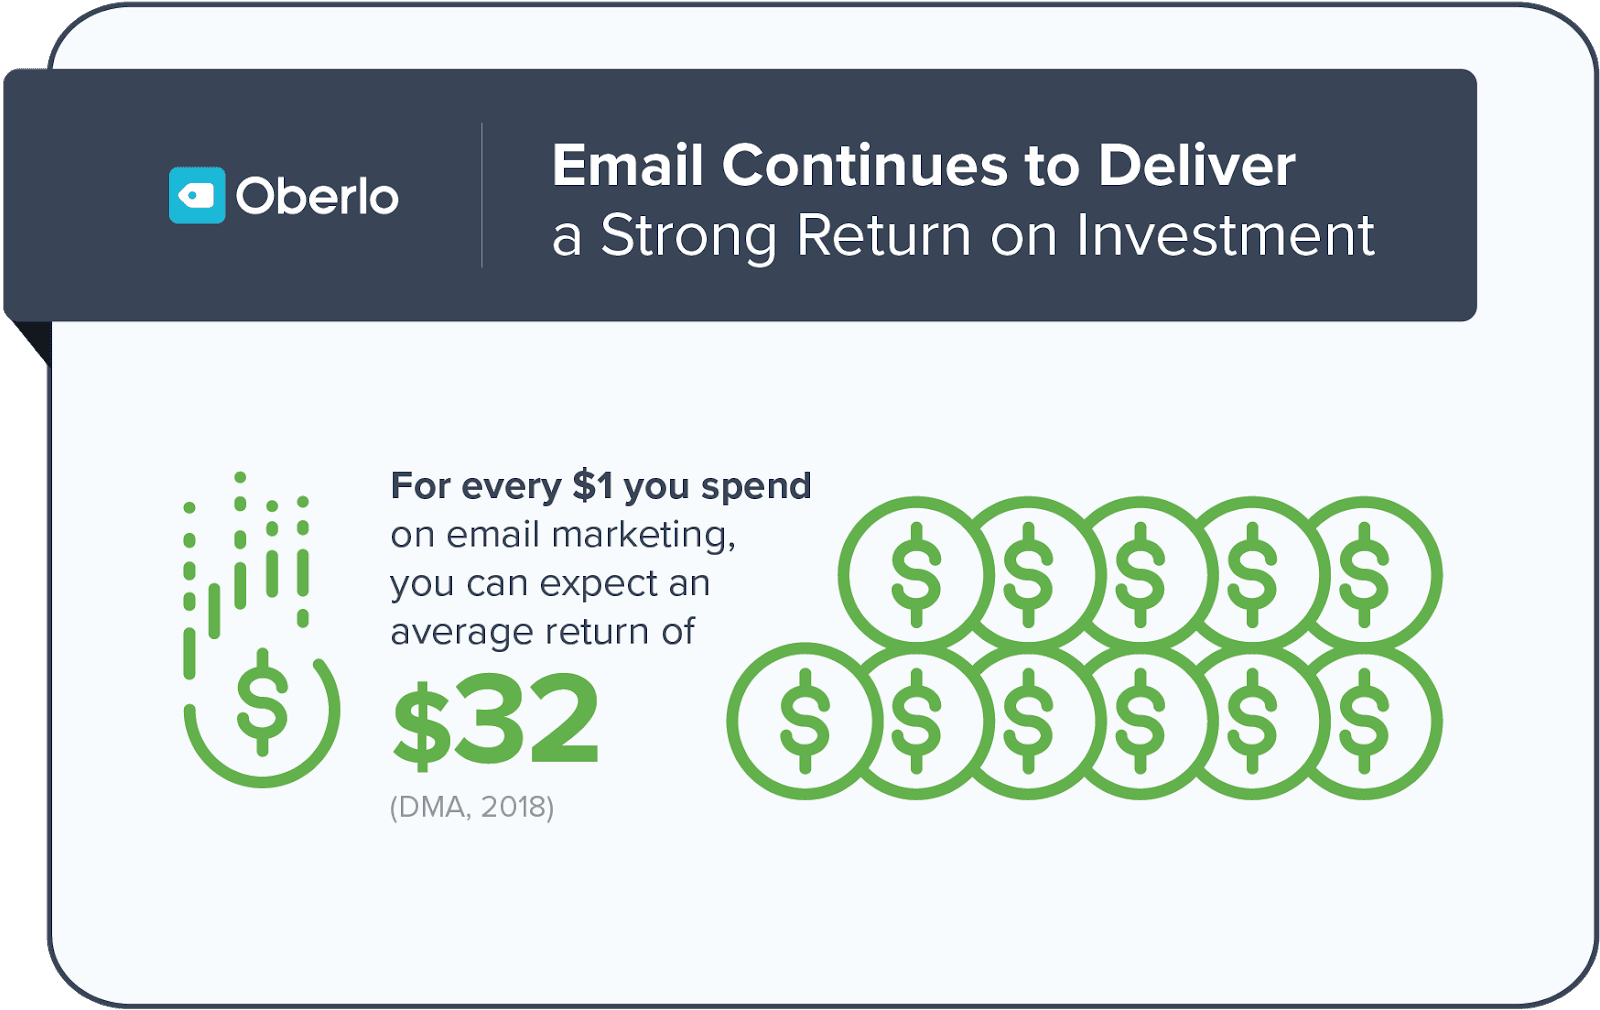
- For every $1 spent, email generates $32 in ROI.
- The average email open rate is 20.81%.
- And emails with personalized subject lines generate 50% higher open rates.
- Sending three abandoned cart emails results in 69% more orders than a single email.
Cold emails generate more sales, allow you to network with more people and get you more subscribers. And the best part of cold emailing is that it’s inexpensive!
The thing is, a lot of people are still unsure of cold emailing because:
- They’re afraid their emails might be dumped into the spam folder.
- They’re afraid they have to invest a lot of time preparing and sending emails with little to no response.
- They’re still unsure that the ROI of cold emails is worthwhile.
What Does the Research Say about Email Marketing?
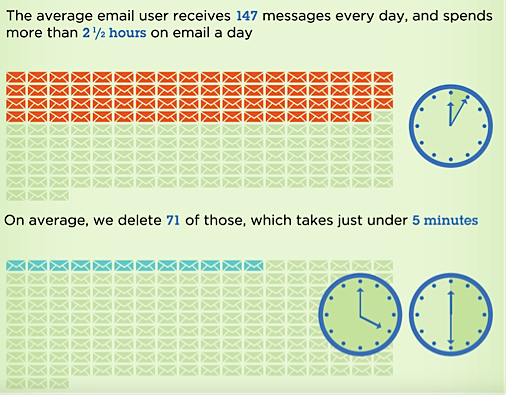
The average person gets 147 e-mails a day — most of which are spammy promos and sales deals.
People make snap decisions on how useful each email is. They’ll delete most within a second of reading the subject line. That’s barely enough time to make a good enough impression to get them to open, let alone read, your content.
That’s why 80% of successful sales require five follow-up emails, and yet 44% of all sales people give up after just one attempt!
It shows that there are two major problems with cold emailing:
- People give up too easily
- The emails they send are often absolute garbage
They have bad subject lines that have readers heading for the delete button before they’ve even opened it, they start off with a canned message that sounds inauthentic, they’re peppered with links and/or they don’t focus on what’s in it for the recipient.
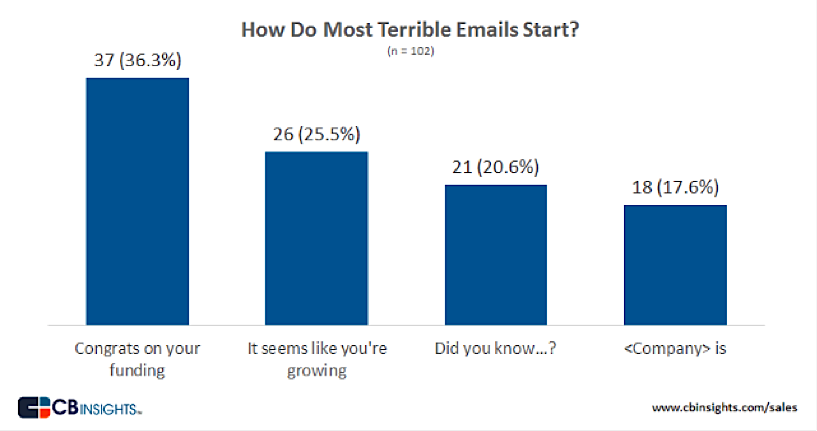
Most terrible cold e-mails start with a generic “congrats on your funding” or “it seems like you’re growing” message, which aren’t tailored to the reader:
Is it any wonder that most salespeople struggle to get a response rate of even 10%?
But those who do cold e-mails right can see incredible results in record time — like one SaaS company that saw these results from a few simple e-mail tweaks:
- 57% open rate
- 21% response rate
- 16 new customers
Even though many of us are drowning in e-mails and would like to see less of them, e-mail is still the number one platform for generating sales. No other platform has conditioned us to expect messages from complete strangers and actually respond as well.
Dive Deeper:
- 7 Creative Ways to Collect Emails Without Being Spammy
- The Customer Acquisition Playbook: Email & In-Person Outreach
- Hacking Email Marketing: 14 Tactics that Work [Infographic]
- The Email Marketer’s 4-Step Guide to GDPR Compliance
- Top 10 Best Email Marketing Services
Getting Inside the Mind of Your Target Audience
I’ll show you some strategies and tactics you can use to skyrocket your response rates. First, though, let’s get inside the mind of your target audience.
1) Understand the Psychology of the Prospect
Many salespeople dive right into e-mail marketing without first taking the time to really get inside the minds of their customers. They immediately focus on blasting out a huge volume of e-mails, hoping that a few people will somehow respond.
This is the main reason why most cold e-mails come off as spammy and are instantly deleted.
Sometimes it’s helpful to know what not to do – Below I’ve created an amalgamation of the bad emails I’ve received over the years.
I’ll kick this off with a templated outline they tend to follow and explain why they do those things. Then I’ll actually write one according to this template and explain (in blue) why it doesn’t work.
Bad email template:
- Introduction: Because we’ve all been trained to think that introducing yourself is the polite thing to do.
- Generic ice breaker/interest builder: Breaking the ice and/or building interest can work, but only when it’s targeted and relevant.
- Pitch your product/service: Because you’re trying to sell to them, right? Let’s just hope your icebreaker has grabbed their attention.
- Soft CTA/hard CTA: Because all good emails end with an actual ask and specific action, right?
Now let’s see why this doesn’t work (with my comments in blue):
Hi [PROSPECT],
My name is [NAME] and I work for [COMPANY].
Good for you. But I’ve got deadlines to hit. So far I see no benefit for me in this so my eyes are already glazing over.
I noticed you’ve recently secured funding and wanted to congratulate you on your success.
I now know this is a generic email blast. It’s just specific enough to be relevant, but nowhere near enough to be useful for me. It shows me this is a mass email and thus the sender doesn’t really care and isn’t sincere. If they hadn’t lost me already, they have now.
Our industry-leading solution helps brands like [PROSPECT’S COMPANY] achieve up to a 65% conversion rate through better cold email outreach. We’ve helped generate over $1 billion in sales for clients across multiple industries and of all sizes (even including a couple of Fortune 500 companies).
With your recent funding, we think we could help you massively increase the success of your marketing and help you generate countless more leads.
This is all about their business. I know they’re trying to pitch me, but they’ve not taken any time to ask about my problems, the challenges we face, or what I need.
I’m not sure if you’re the right person to speak to about this. If not, I’d really appreciate it if you could forward this to the person who’s best suited to help out.
Alternatively, feel free to book a time slot so we can jump on the phone and discuss a potential collaboration here.
They’ve basically admitted that they haven’t done their research, since they don’t even know if I’m the right person. Then they ask me to jump on the phone!?
Do you see why this doesn’t work? E-mails like this aren’t just low converting — they’re annoying. They show an obvious lack of research, demonstrate zero empathy for the user, and are honestly a bit selfish.
When reading cold emails I always like to switch up the situation and imagine that someone’s trying to get a person’s phone number in a bar.
In the above example, you’ve basically walked up to a stranger, told them your name and said what a great person you are. Then you’ve proceeded to say “if you’re not interested, maybe forward me on to one of your friends?” before asking for their number.
That would never work, right?
So here are a few key things to remember about the psychology of readers before sending an e-mail.
Dive Deeper: 10 Psychological Hacks to Improve Your Content Marketing
Sell to the Emotional Human, not the Logical Corporation
Many cold e-mails fall flat because they don’t take into account the fact that they’re selling to individuals first, not corporations.
Sometimes we forget that the person at the other end of the e-mail is just like us — with the same range of emotions, hopes and fears. It might seem like we’re selling to companies that make logical, formal decisions about what products they buy, but in reality those decisions are heavily influenced by the emotions of the people making those decisions.
It’s a well-known fact that people buy with emotion, then justify it afterwards with logic. In fact, a Harvard Business School professor says that 95% of our purchase decision-making takes place subconsciously!
Years ago I worked with an incredibly successful consultant ($10,000,000+ per year). He made a great point about there being no such thing as business problems. Rather, people’s personal and professional problems are interlinked:
- Can’t hit that deadline? Gonna have a sleepless night.
- Revenue down? Experience constant anxiety over staff paychecks and making your own rent.
- Landed that big deal? Feel great for the next 72 hours.
The same thing applies to cold e-mails. For example, you should explain in your e-mail why your product or service benefits the recipient personally.
You can’t say it will help them sleep easier, but you can highlight how it will personally affect them at work. They’ll usually make that final connection themselves.
Company Problem = Sales team underperforming
V
Sales Manager Solution = Need to increase team productivity
V
Personal Solution = Less anxiety / get that raise / build their reputation
The customer is aware of the first and third problem and potential benefit. Your job is to highlight the specific solution for their role because obviously they haven’t found it yet (if they had, they wouldn’t need you).
Highlight the solution for their problem, and they’ll fill in the gaps.
Here are a few examples of ideas in the form of subject lines that should help people make those connections:
- “What [ANOTHER OF YOUR CLIENTS] did to secure their promotion to sales team manager”
- “How [INDIRECT COMPETITOR] increased sales team productivity by 123%”
You’ve got to get into the head of your recipients, figure out the issue that’s bothering them, and tailor your email to their specific needs.
Here’s an e-mail that’s personalized to the prospect and offers instant value:
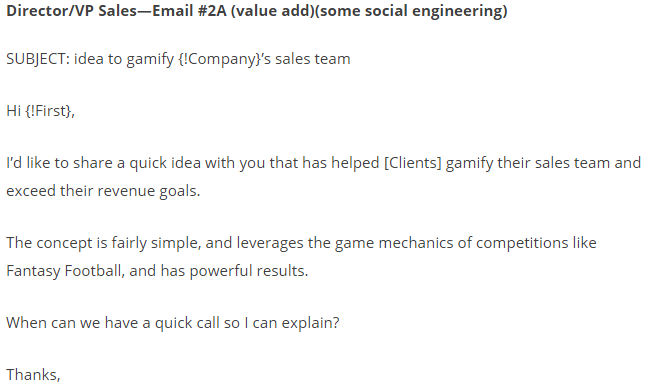
Let’s imagine that the recipient is a content manager at a large company. You know from your research that the biggest problem people in these positions face is generating tangible business returns from their content marketing efforts. Here’s an example email you could send:
Subject line: Something I noticed on the [COMPANY] blog
Hey [NAME],
I noticed a little something that could help you increase the conversions from the [COMPANY] blog.
If you take a look at this article (<– hyperlink this), you’ll see that there are three areas where customer intent to download your e-book on [TOPIC] would be really high:
-
- Area 1
- Area 2
- Area 3
I’ve helped [INDIRECT COMPETITOR] implement a similar tactic across their blog and it’s led to a 247% increase in new leads.
If you’d like to chat about a few other areas it could work for [COMPANY], let me know and I’ll clear 30 mins to jump on the phone.
Thanks!
This email shows that you understand the problem they are facing. It also offers something of value to them, which is going to make you stand out from the hundreds of other hard sells they get.
Send Your E-mail at the Right Time
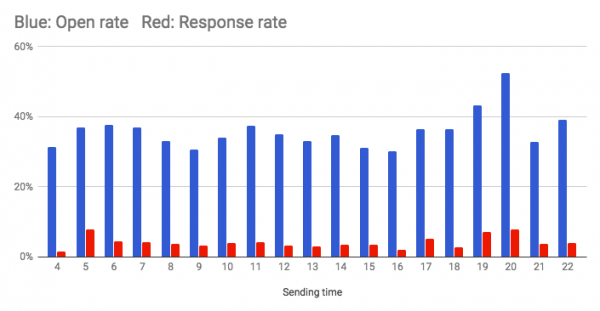
The exact open-rate numbers for specific times vary, of course, but overall, you want to catch your prospects when they are fresh-minded and in work mode, which usually means first thing in the morning or in the early evening.
Emailing between 5-6 a.m. could get you an open rate of 37% and a response rate of 8%. E-mailing your prospects between 7-9 p.m. could help you achieve an open rate of 48% and response rate of 8%:
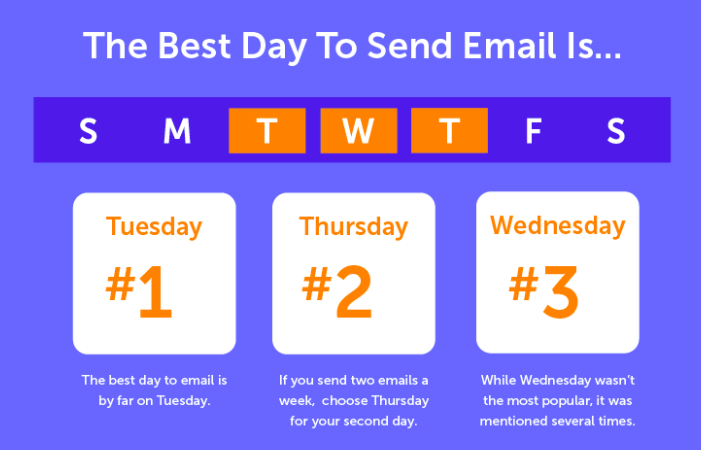
And according to 14 studies curated by CoSchedule, the best days to send e-mails is Tuesday, Thursday and Wednesday (in that order):
Understand Your Prospects’ Workflow
Whenever we send out an e-mail asking people to sign up for a demo or get on a sales call, it’s usually at the center of our attention. It’s one of the most important things we focus on all day. But to the average prospect, your e-mail is just a small blip in their day. They have other, more pressing, problems to worry about.
If you’re a busy VP of sales, you’re dealing with a million things during your day, and reading a cold e-mail is not on the top of your list. Now try to imagine what sort of message would make you want to respond and get on a call with the salesperson?
It’s important to understand the workflow that your prospects go through in a typical day and try to make your e-mail fit within that workflow. For a prospect who’s having a tough day, a bad cold e-mail could make them even more agitated.
But a good e-mail will help you earn their respect, which would likely lead to a response. Like it or not, you’re also being judged by your prospects on your ability to sell, not just what you’re selling.
Dive Deeper:
- Buyer’s Journey 101: What Your Email Data Says About Your Customers
- How to Use Personalization to Increase the Impact of Email Marketing
- How AI Helps Add Personalization to Your Email Campaigns
- 8 Ideas for Compelling Emails to Send During the Holidays
2) Grab Their Attention with the Perfect Subject Line
Once you send an e-mail, there’s only one thing that determines whether your prospect will actually read it or not: your subject line. If you get that wrong, then all the hard work you put into the body of the e-mail goes to waste. No one will read it.
That’s what happens to nearly 50% of the e-mails we receive every single day; we delete them in under five minutes:
It’s not easy to write the perfect subject line. You have to walk a fine line between telling them about your product and keeping it general enough to evoke curiosity. The best e-mail subject lines are creative, interest-provoking and informative without giving too much away.
Here a few examples of subject lines that work well:
1) Quick Question
Asking a “quick question” is a great way to invoke curiosity. According to the American Psychological Association, people find this kind of uncertainty very unsettling. It just keeps nagging at them until they open the e-mail to see what your quick question is. And because you wrote “quick question,” they know it’s not going to be ten pages long (so don’t make it ten pages long!).
Here are a few “quick question” subject lines I’ve used to great effect in the past (often around a 40-50% open rate – much higher than the average):
- Quick question for you [NAME]
- Quick question about [COMPANY]’s [PROCESS/STRATEGY]
- I’d love to get your opinion on this, [NAME]
Note how they’re really short, get to the point, but are still intriguing.
Here’s an example email I’ve actually used which works really well. I’ve amended the copy to be a potential for an agency who helps lead generation for brands with PPC.
Subject line: Quick question for you, [NAME]
Hey [NAME],
I stumbled across the [COMPANY] site and noticed you guys are using multi-step landing pages for your opt-ins.
Was hoping you could spare 30 seconds just to let me know how it’s working for you guys.
I work with [YOUR OWN COMPANY] and we’ve generally seen multi-step pages work well for PPC ads, but yours are a little different.
In particular, you’re running them with almost double the fields we do and I was just wondering how it’s affecting conversions.
I understand you’re busy, so if you don’t have time to respond, no worries.
Thanks for your time!
Signature
Notice how there’s no sell in that email. I ask about something relevant to the company and the service being sold. But more than anything, I’m just trying to get a response to open a dialogue.
2) X Tips for [Company] for [Pain Point]
People love numbered lists. We already know how successful they are in blog post headlines. List posts are among the most commonly read and shared blog posts of all.
According to CoSchedule, the reasons for this are that they:
- Attract audience attention by their obscure number
- Show your expertise
- Are immensely actionable for your audience as they read your content
- Are super informative
- Are easy to read and scan for the big takeaways
The same principles apply to cold e-mails, too. If your prospect is busy with work and has a crowded inbox with a million things demanding their attention, then they’d be more likely to open a list-style e-mail because they would expect to be able to skim it easily.
Here are a few potential subject lines for a list:
- 5 steps [BRAND] took to [ACHIEVE GOAL]
- The 3 things every good [JOB ROLE] needs to know
- 7-point checklist to finding the best hire
3) “Congrats on [Specific Result]!”
You can congratulate your prospects on a great quarter, press coverage, new product or feature release, raising financing and more – depending on what feels appropriate.
Most people send these types of “congratulations” in the body of the e-mail. This can work, but the more value you can add in the subject line itself, the more likely that your e-mail will get read.
Just be sure that, whatever it is you’re congratulating them for, you personalize the email to reflect their company specifically.
Here are some example subject lines:
- Congrats on [ACHIEVEMENT], [NAME]!
- What’s the next step after [ACHIEVEMENT]?
4) Praise-Related Subject Lines
Everybody loves to be recognized and appreciated for what they do. If you’re reaching out to a thought leader in your industry, try tailoring your subject line to praise that person.
For example, you could say something like “I’ve heard about your skills in XYZ field and I thought I’d get in touch” or “I’ve been following your blog for a while.”
Here are some example subject lines:
- It’s great to finally connect with [SOMETHING SPECIFIC TO THEM]
- I’d love your expert opinion on this, [NAME]
- I loved your [ACHIEVEMENT/NOTABLE ACTION], [NAME]
Here’s how that last one might play out in an email:
Hey [NAME],
Just wanted to say I loved the work you did on the [CAMPAIGN]. That has to be one of the best examples of [STRATEGY] I’ve ever seen.
What gave you the inspiration for it? I work in a similar field and we’ve had some great results in [YOUR SERVICE] and your campaign is really innovative.
Thanks for the inspiration and keep on keeping on!
Signature
Again, I’m not trying to click bait them into opening the email. A lot of people send something like this and then quickly switch to a generic pitch, which is only going to annoy them.
If you are praising someone, be sincere. Look at this as a way to learn about what they do and a way to open a dialogue. When you know more about their processes, you can make a more natural, better-targeted pitch.
Dive Deeper: How to Write Hero Headlines to Skyrocket Click-Through Rates
5) Use a Familiar Sender Name
The sender name is what people typically look at first before they read the subject line when they get an e-mail in their inbox. If the sender’s name doesn’t sound like someone you want to hear from, it doesn’t matter what your subject line is – people won’t open the e-mail.
For example, you should never use generic company email addresses, like [email protected] or [email protected]. Apart from making you sound like a robot, people are generally not going to reply to those e-mails or add them to their contacts – which reduces the chances of your e-mails showing up in their “primary” inbox.
Instead, you can include a person’s name and company as your “sender name.” When we send emails from “Eric Siu, Single Grain” we get a much higher click-through and open rate compared to e-mails sent from just “Single Grain.”
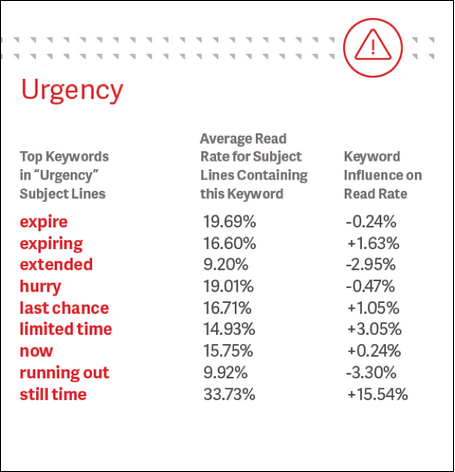
6) Create Urgency
Subject lines that have a sense of urgency have a better chance of being opened. Here are some examples from Digital Marketer’s e-mail subject lines with sky-high open rates:
- [Last Call] For the Ultimate Email Marketing Game Plan (PDF)
- [Last Chance] 75% Off all Our Execution Plans Ends TOMORROW!
- CLOSING down soon! (Don’t get locked out!)
- There is still time….
One of the biggest barriers that stop people from moving down your sales funnel is procrastination. They might see your e-mail or offer and think to themselves “I’ll get to this later.” By adding urgency to your subject lines, you can boost your open rates and response rates.
The below chart lists a set of words that you can use in your e-mail subject lines to create urgency (and also displays the average read rate for the e-mails containing these words):
7) Subject Line Length
The length of the subject line plays an important role in converting the prospect. Surprisingly, subject lines that are between 98-111 characters long have a 54% open rate (based on a study conducted by Prospect.io).

8) Pay Attention to Your First Sentence
The first sentence of your e-mail is super important. In addition to your subject line and sender name, prospects also see a preview of your e-mail in their inbox (most e-mail clients, that is, like Gmail, the iPhone e-mail app and Outlook):

Also, be aware that some e-mail service providers allow you to create a specific message for this preview. It’ll be listed under the meta tag option. If your email service provider does offer this, use it. It’s more flexible than having to tailor your opening line for this specific approach.
This can also be a great opportunity to hook your audience with urgency or praise. Just try to tie it in with the subject line you’ve run with. Make it a logical next step and not just a cheap promo slot.
Examples of some eye-catching subject lines and opening sentences in the body of your email:
- Quick question about [COMPANY]’s [PROCESS]: Your sales process is incredible! I’d love to know how you optimized it.
- 7-point checklist to finding the best hire: Hey [NAME], these tips will save you a ton of time, effort and money!
- [Last Call] For the Ultimate Email Marketing Game Plan (PDF): This offer will never be run again so take advantage of it now!
9) Test Your Subject Lines
Apart from A/B testing, there are other ways to test whether your subject line will lead to increased open rates or not.
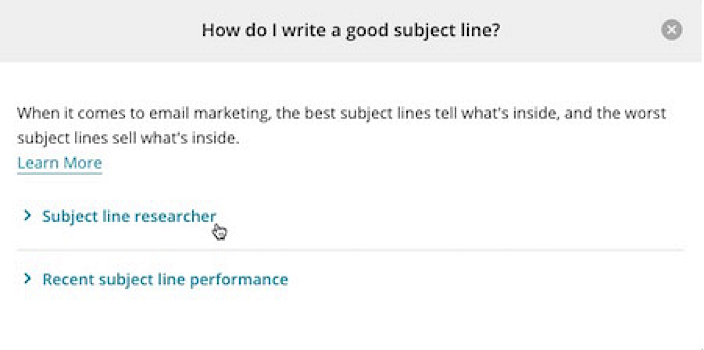
Depending on your e-mail client, you might be able to leverage the help of a “subject line analyzer.” For example, MailChimp has a subject line research tool that allows you to compare your subject line phrase to all others that have been sent through MailChimp. Then it will give you a rating (from one to five stars) on how good that subject line is.
When you’re about to enter your e-mail subject for your campaign, click on “How do I write a good subject line?”
Then click on “Subject line researcher.”
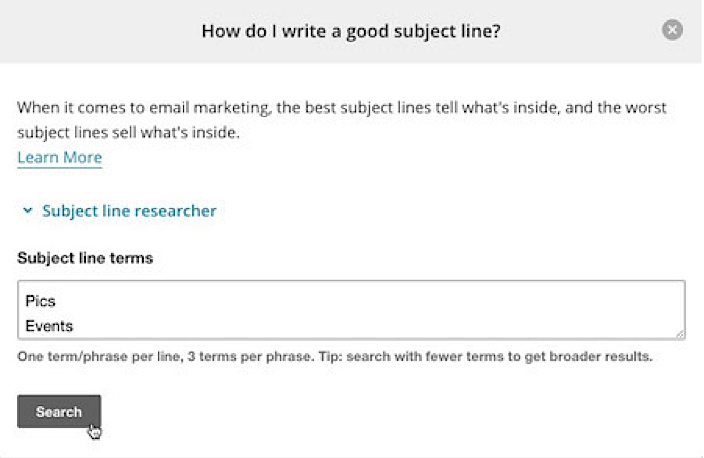
Enter your “subject line terms.” From there, you can click “search” to see how your phrases compare against other terms and phrases from MailChimp campaigns.
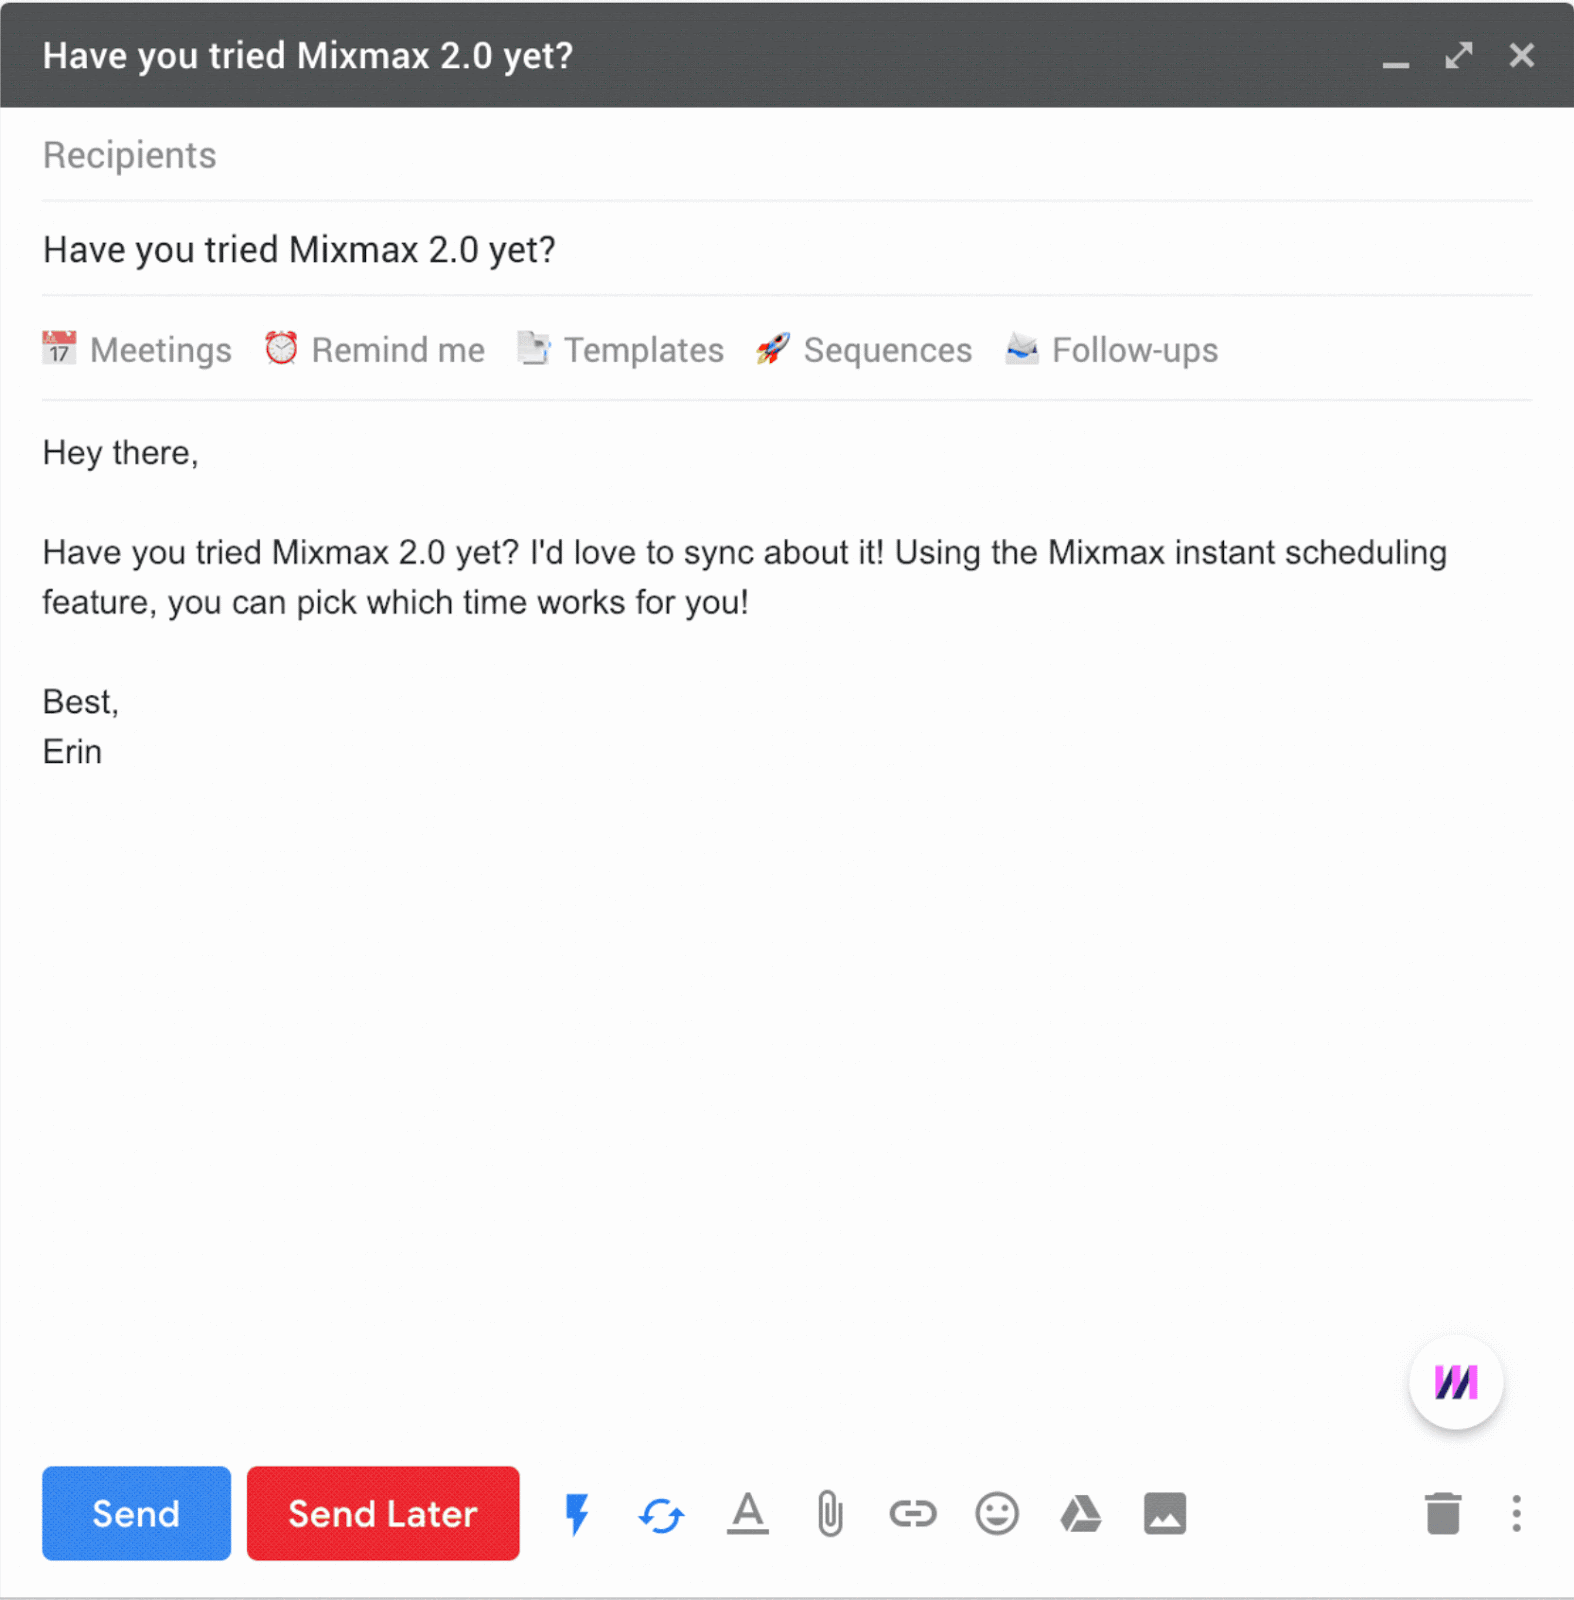
Most cold e-mail clients also have A/B testing tools that are easy to use, such as Mixmax:
Here are some examples of subject lines that work really well:
- [MUTUAL CONNECTION] recommended that I reach out
- Hey [NAME], quick question about [COMPANY PROCESS]
- A [KEY BENEFIT] for [COMPANY]
- X Tips to overcome [COMPANY PAIN POINT]
- Are you still using [OUTDATED THING THAT YOU WANT YOUR RECIPIENT TO DITCH]?
3) Write Top-Notch E-mail Copy
Now that you’ve gotten your prospect’s attention and inspired them to open your e-mail, the real work begins. You have a very short window of time between the person opening the e-mail and getting them to take the action you want them to take.
Here are a few tips on how to create email copy that’s as compelling as your newly optimized subject line.
1) Brevity Is the Soul of Wit
Everyone’s inboxes are overflowing. If you send a potential lead a War and Peace-length email, they’re going to take one look and immediately click “delete”.
You need to get to the point quickly. A cold email is not the place to outline all the features and benefits of your service; it’s to get that first “yes”. You’re really only looking for a response so that they’re more receptive to your follow up.
2) Ditch the Elevator Pitch
We’re a successful multinational brand that has helped a myriad of businesses such as…
Yawn.
If there’s one thing that no one likes receiving it’s pitch emails. Writing your email as if it’s a pitch is a surefire way to get it deleted. I’m not saying you can’t pitch, just don’t lead with it. Instead, look at it as building a relationship with the recipient.
Dive Deeper: How to Write Content for People and Optimize It for Google
3) Be Human
Yes, your target might work as an executive in one of the world’s biggest companies. And yes, they might be a very serious person in the office. But they probably also went to see Avengers: Endgame. They might have a P.T. Anderson obsession or adore trashy romance novels. Or maybe they play adult recreational league baseball on the weekends.
It’s easy to see high-powered people as nothing but Mr. or Mrs. Business. Boring people who have no life and spend all day thinking about key metrics and goals. But really, they’re just people like you and me.
A little levity, humor and personality can go a long way. Don’t believe me? Take five minutes to check out Jon Buchan’s Charm Offensive site.
Here’s an example of how you might want to approach this kind of email copy:
Hey [NAME],
So I recently checked out the talk you gave at [EVENT].
Obviously it’s a great talk. The millions of views on YouTube are proof enough without me throwing my 2 cents in.
But here’s the thing I’m a little confused about. You mention that [STRATEGY] is a great way to increase [METRIC]. And I agree.
But where do you go from there? We’ve been running tests on [STRATEGY 2] and seen some great results with our clients. However, I’m wondering if there’s another approach.
I’d love to pick your brain on this and see if, together, we can’t come up with a new groundbreaking strategy.
And hey, if it works, I’m more than happy for you to use it in your next talk. 😉
Let me know if you’ve got a spare 15 minutes and I’ll clear the time on my end.
Cheers!
Another option is to use proven psychological frameworks to get prospects to read every sentence of your e-mail and take action.
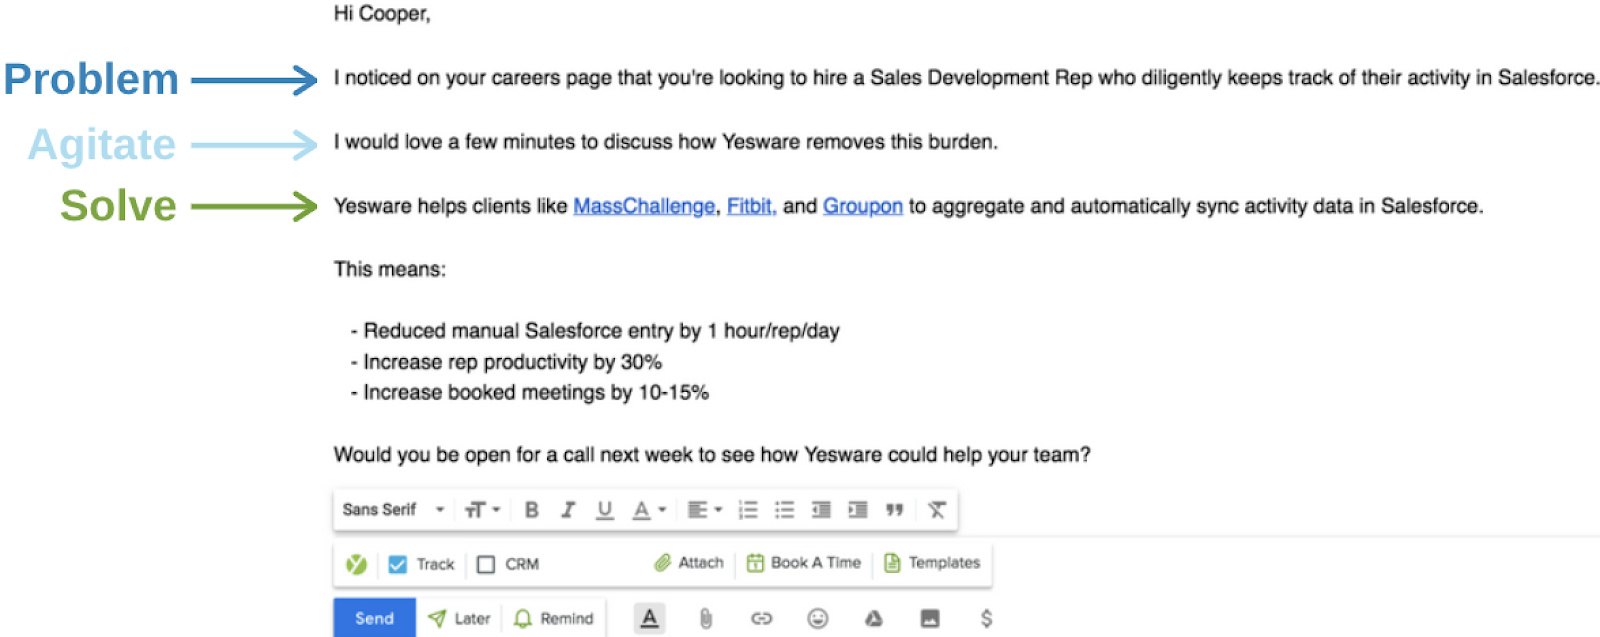
For example, Yesware used a technique in their cold e-mails called the “Before-After-Bridge” that starts by talking about the prospect’s current problem, what their world would look like after they solved it, and how to get there:
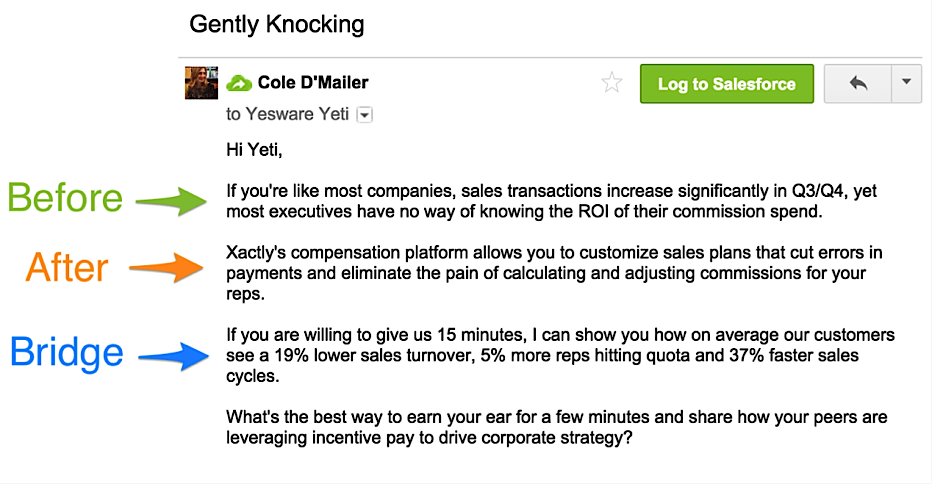 Here’s how something like this might work for you:
Hey [NAME],
Most companies see social media as a simple customer service tool. It’s there to answer questions and build brand reach, but most find the conversion rate to be low and/or difficult to track.
Here’s the thing though: It doesn’t have to be.
Marvel managed to implement a social strategy which directly led to sales (and sold out weeks’ worth of movie tickets) thanks to a 68% conversion rate.
I’d love to run you through the social commerce strategy we implemented for them and how it might be used for similar results for [THEIR COMPANY].
If you’re interested, let me know and I’ll clear some time and shoot over some details.
Cheers!
Signature
Dive Deeper:
- 14 Ways to Kickstart Your Mobile Email Marketing Campaign
- 8 Quick Tips to Ensure SEO-Friendly Emails
- Beyond the Newsletter: You’ve Got Their Email, Now What?
- Email Marketing Myths & Truths: How to Enhance Your Email Marketing Strategy
4) Use Automation to Increase Your Sales Volume
You can use all the right subject line and copywriting tactics to get your response rates up, but at the end of the day, successful cold e-mail marketing is about volume. You have to send out a lot of e-mails day after day.
One way to simplify this is by using cold e-mail automation tools that allow you to send out e-mails more efficiently and automate your follow ups.
Automated drip campaigns have an 80% higher open rate and a 300% higher click-through rate. Below is a list of automated e-mail types that you must certainly have in order to increase your conversions.
Dive Deeper: 5 Trends that Will Define the New Vision of Marketing Automation
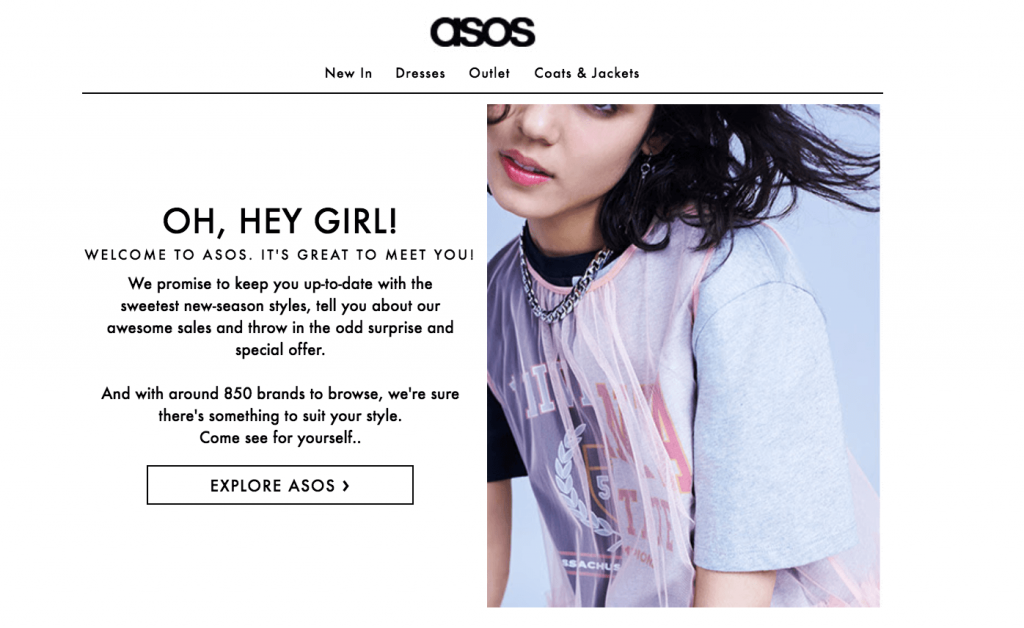
A) Welcome E-mails
Welcome e-mails are those that are sent whenever a new customer signs up for your service. Fashion brand Asos sends welcome emails that are casual in style and contain a great message:
B) Curation E-mails
These e-mails showcase your best products or services depending on the customer behavior, location, time and persona. Jay Baer, founder of Convince and Convert, sends specially curated e-mails that contain content on a particular subject from reputed sources:

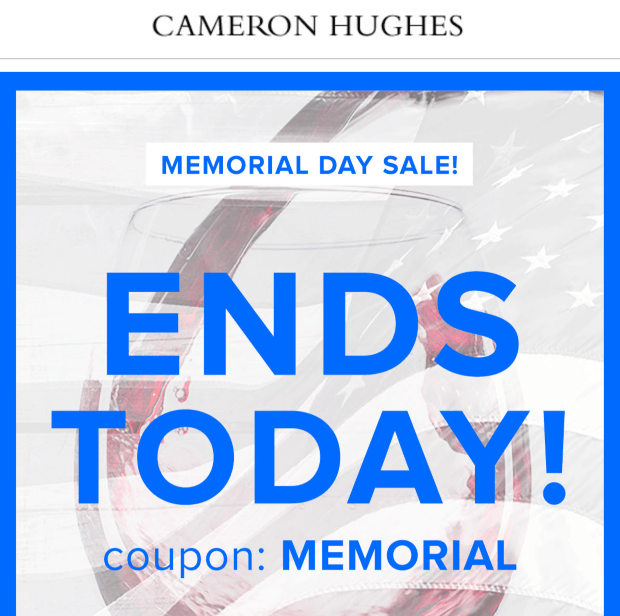
C) Discount E-mails
These e-mails contain personalized offers for the customer and are hard to resist. The below sales e-mail from Cameron Hughes is the best example of presenting an offer that is simple yet effective:
E) Abandoned Cart E-mails
These e-mails are sent as a friendly reminder to the shopper to complete the purchase. Fab sends regular abandoned cart e-mails to its customers that contain a direct link to their cart to make it easy to purchase the product (along with the product description). It also contains a message for the customer that alerts them that they need to act fast to grab the offer:

There are several tools for sending automated e-mails, such as:
- Close.io – to automatically track your sales e-mails in one place and send outreach e-mails with one click
- Reply – to automate personalized e-mails and follow ups
- Mixmax – to personalize bulk emails, schedule messages, and send emails that feature email tracking
5) Be Persistent in Your Follow-Up E-mails
Consistent follow-up e-mails are crucial when you’re doing cold outreach. You might luck out and get a phone call appointment on your first try, but chances are you won’t succeed until you go through multiple follow ups.
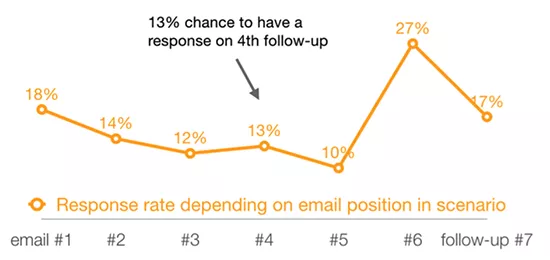
Most sales people stop after sending one or two follow-up e-mails, but the ones who continue until the sixth follow-up actually generate 80% of sales. In a study from Iko System, it was revealed that the sixth follow-up e-mail receives a massive 27% response compared to an 18% response rate to the first email:
The key here is to remain consistent with your follow ups and use some proven strategies to convince the prospect. Here are a few ways to increase your response rates through your follow-up e-mails:
A) Follow Up Right After You Leave a Voicemail
If you try calling your prospect and aren’t able to reach them, send them a quick follow-up e-mail right after you leave a voicemail:
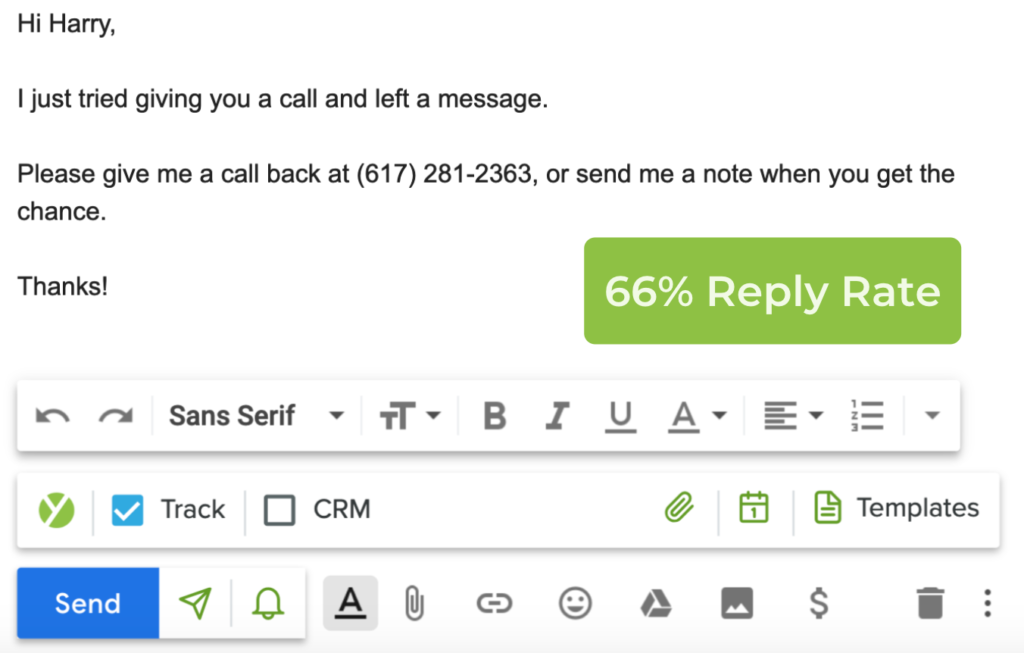
This doesn’t have to be a long email. You’re basically just reminding them and ensuring they check out the voicemail.
Here’s how that might play out:
Hi [NAME],
Just tried to give you a call and got your voicemail. Guess you’re busy out there [ACHIEVING GOAL]!
Anyway, it’s nothing too important but I would love to get it off my desk so I can stop pestering you!
Feel free to call me on [NUMBER] or shoot me an email when you’ve got a chance to discuss.
Cheers!
Signature
According to research, this works because you allow your prospects to observe you through both their eyes and ears. Because you’re reaching them across multiple senses, you increase the impact of your e-mail.
B) Reference Behavioral Insights
Personalization is a huge factor when it comes to cold e-mail success. Unfortunately, most salespeople think that personalization is limited to things like greetings or subject lines. Obviously, you need to use the name of your prospects in the e-mail, but behavioral-based personalization gives you far better results:
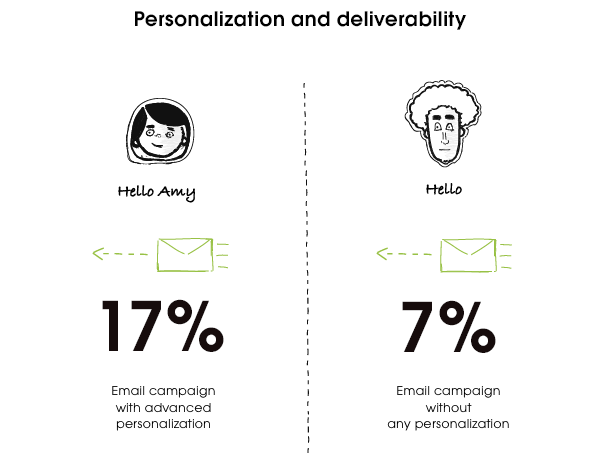
For example, the following e-mail gets a 50% reply rate because of personalization based on the behavior of the recipient:
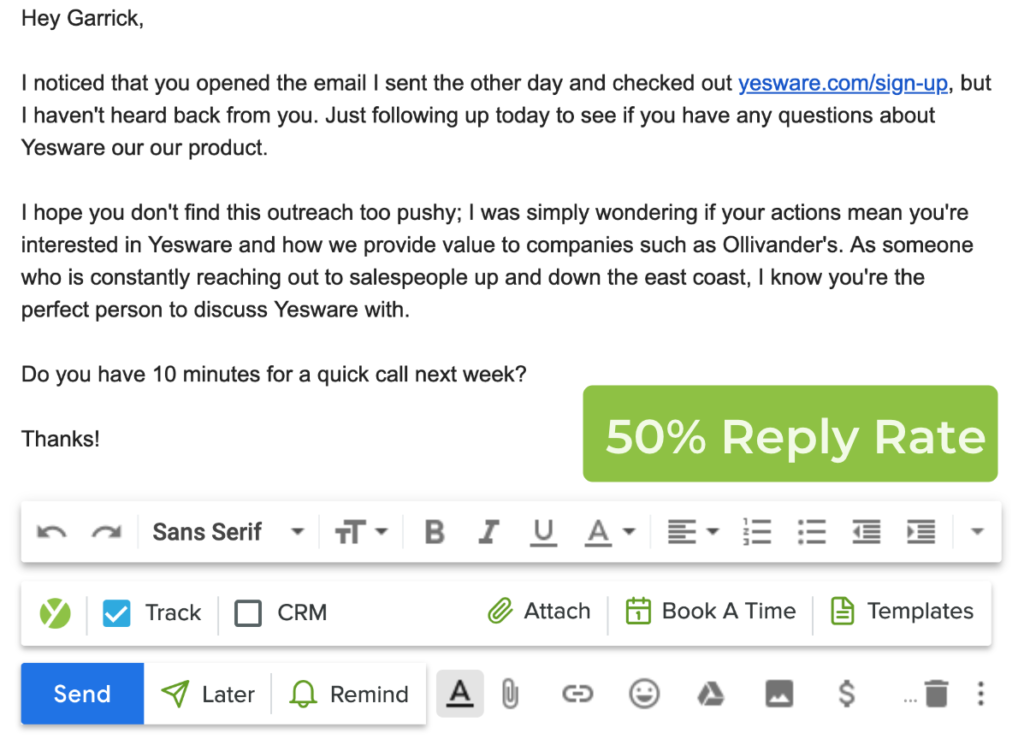
Let’s create our own example.
Imagine that you’ve got a decent ABM strategy and tracking set up. You notice that someone from Company A keeps checking out the pricing page. You might want to send them something like this:
Hey [NAME],
I know this is a little creepy, but we’ve noticed that someone at [COMPANY] keeps checking out our pricing page every few days.
However, looking at our logs it doesn’t look like anyone’s reached out yet.
I’m guessing that you’re thinking about checking out [OUR SERVICE] and are just trying to figure out how to tie it to your budget.
If it’s easier, I’d be happy to jump on a quick 10-minute call to run you through our tiers properly and, if possible, hook you up with an initial discount so you can give everything a try.
Let me know if this is of interest, or just book a time to chat through the below calendar link.
Cheers!
Signature
If you see that a prospect is opening an e-mail and clicking links but not responding, you can send a quick follow-up saying that you noticed and offer to tell your prospect more about your business over a phone call.
Because your follow-up e-mail feels tailored to the recipient (i.e. you’re following up because you noticed specific behavior, rather than sending out blanket follow-up templates to everyone), you’re more likely to get a response.
Another great example of behavioral e-mail marketing is from Asics. The company sends e-mails to customers who have added products to their cart but haven’t bought them yet:
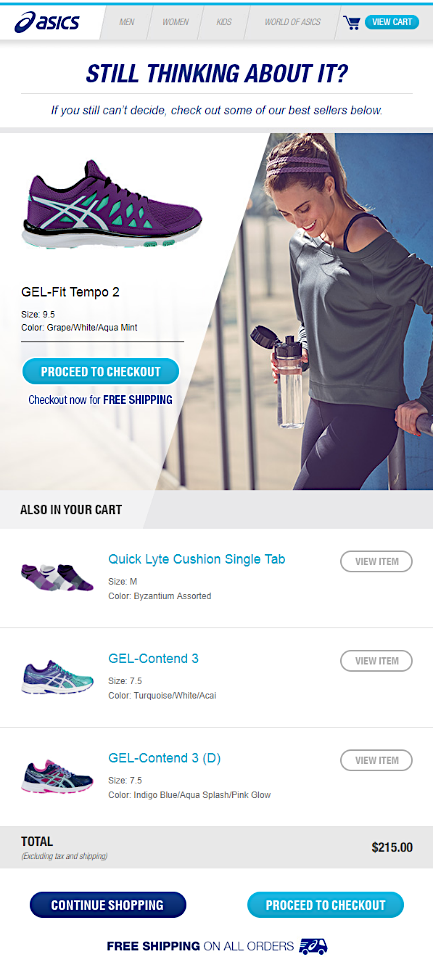
Highlighting the abandoned products and offering a special discount to complete the purchase is a great way to generate more conversions.
Dive Deeper: The Ultimate Guide to Developing Buyer Personas (with Templates!)
C) Make Follow-up E-mails Different from the First Cold E-mail
It’s tempting to fire off a basic “just checking in” message once you’ve spent so much time crafting a beautiful first e-mail. But since it can take so many touchpoints to reach a prospect, you need to create a unique follow-up e-mail that will capture more interest – not erode the little interest you’ve already created!
Each e-mail should follow a narrative and keep telling a story, but avoid repetition. Make sure you have enough interesting things to say, share or ask and spread those pieces out over the length of your sequence.
Let’s imagine that the recipient has jumped on a call with you but after two follow-up e-mails not responded. One method to follow up might be to send them a quick use case example.
It’s more story led and, thanks to the content, shows them what working with you can achieve. It’s much longer than you’re advised with emails, but the main goal is to re-engage them by getting a response.
Here’s how that might play out:
Hey [NAME],
Great chatting on the phone the other day. Just wanted to follow up with something I thought you might find interesting.
A little while back we worked with [INDIRECT COMPETITOR]. They were having some of the same issues you’re facing, namely:
-
- Lack of leads generated from their website
- Fully manual processes for following up
We helped them improve the processes of their website, in particular by:
-
- Automating the initial follow-ups to free up time of key staff members
- Training those staff members to increase leads from the website through live chat
After a 4-week period of implementation and adoption of the relevant tech we saw:
-
- Lead generation improved by 162%
- Leads closed improved by 22%
- An overall revenue increase of $107,000 / year (and growing!)
We’ve got a detailed case study of this I can shoot over if you like. Let me know and I’ll send it right way.
Thanks!
Signature
6) Have Fewer Prospects in Your Campaign
The greater the number of prospects you contact, the higher the chances of getting a response does not hold true in the case of cold e-mail marketing. In fact, sending e-mails to a group of carefully chosen prospects helps you receive the maximum number of responses.
When you are building a list for your e-mail campaign, it is important to filter the prospects who meet a certain criteria.
For example, let’s say a dog food store is looking to generate conversions from e-mail marketing. Instead of selecting all dog owners in the USA, it selects only those dog owners who live in Dothan and who own a Labrador so that they can pitch them dog food products specifically for Labradors from their local dog store in Dothan.
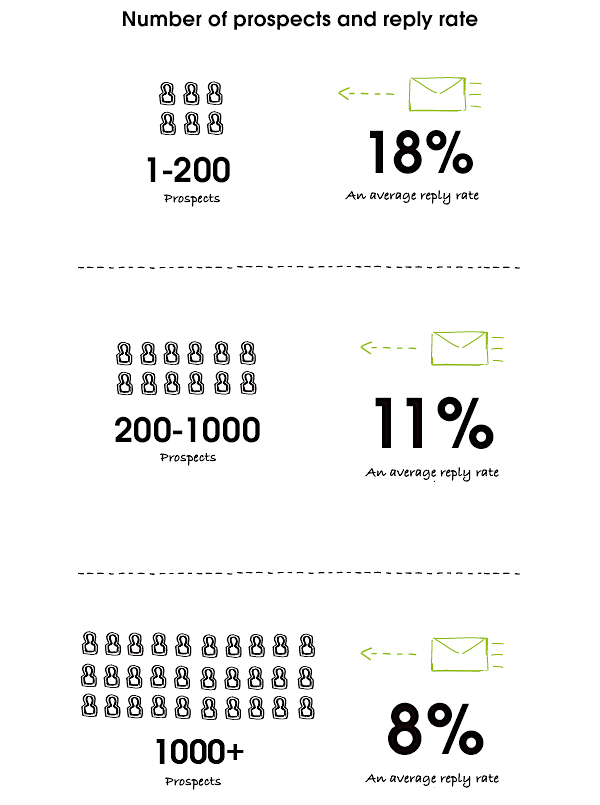
So don’t worry about trying to blast as many people as possible, but do personalize your e-mails to the prospects you are sending it to. According to Woodpecker, keeping the number of your prospects between 1-200 can generate a response rate of 18% – a number that goes down as the recipients go up:
Dive Deeper:
- How to Collect and Use Emails Without Breaking Amazon’s Terms of Service
- The 8 Best Outbound Sales Automation Tools for Cold Emailing
- Email Marketing vs. Chatbot Marketing: The Ultimate Showdown
- How to Create A High-Value Lead Magnet to Quickly Grow Your Email List
7) Use the Problem-Agitate-Solve (PAS) Model
Using this tactic, you can identify the most pressing problems of your prospects, agitate these pain points and offer a solution in the form of your product or service.
People want to get rid of their pain or discomfort or inconvenience, and this is the reason they readily respond to such e-mails. But, again, you need to really know your customers for this to work well.
Let’s run through an example. Imagine that the customer is the head of paid acquisition and you offer a service that helps them more accurately amend bids.
Subject line: Fed up with ad costs increasing [NAME]?
Hey [NAME],
The question in the subject line is, honestly, a rhetorical question. We’re all fed up with Facebook and Google ad costs continually rising.
It costs us more money to run ads and makes it a riskier game to be in. Get a win and your return is smaller; make a loss and it could decimate your ad budget.
Over the last 5 years we’ve been running countless experiments to reduce ad spend by better managing bids.
I’ve got a free cheat sheet that I can send over if you’d like. Or I can jump on the phone to explain how [COMPANY] might benefit from a couple of the actions.
Let me know if you’re interested and I’ll shoot over the tips and clear some time to chat.
Cheers!
Signature
Here’s another example of an e-mail based on the PAS model:
The PAS solution is powerful because it means that your emails can be kept short. And when well-targeted, the reader can’t really ignore them because they’re so focused on their specific pain points.
The whole process maintains a natural flow and helps the prospect make an immediate decision in favor of the sender.
Putting It All Together
Cold e-mail outreach can be a massively beneficial tactic for those who know how to do it right. If you can come up with the right subject lines to get your prospects’ attention, maintain it with value-laden e-mail copy, and then automate them to scale their reach, you will save time, get better reply rates, and grow your business.
For more cold e-mail templates that work, check out the next post in this series: Cold Email Templates that Get Responses